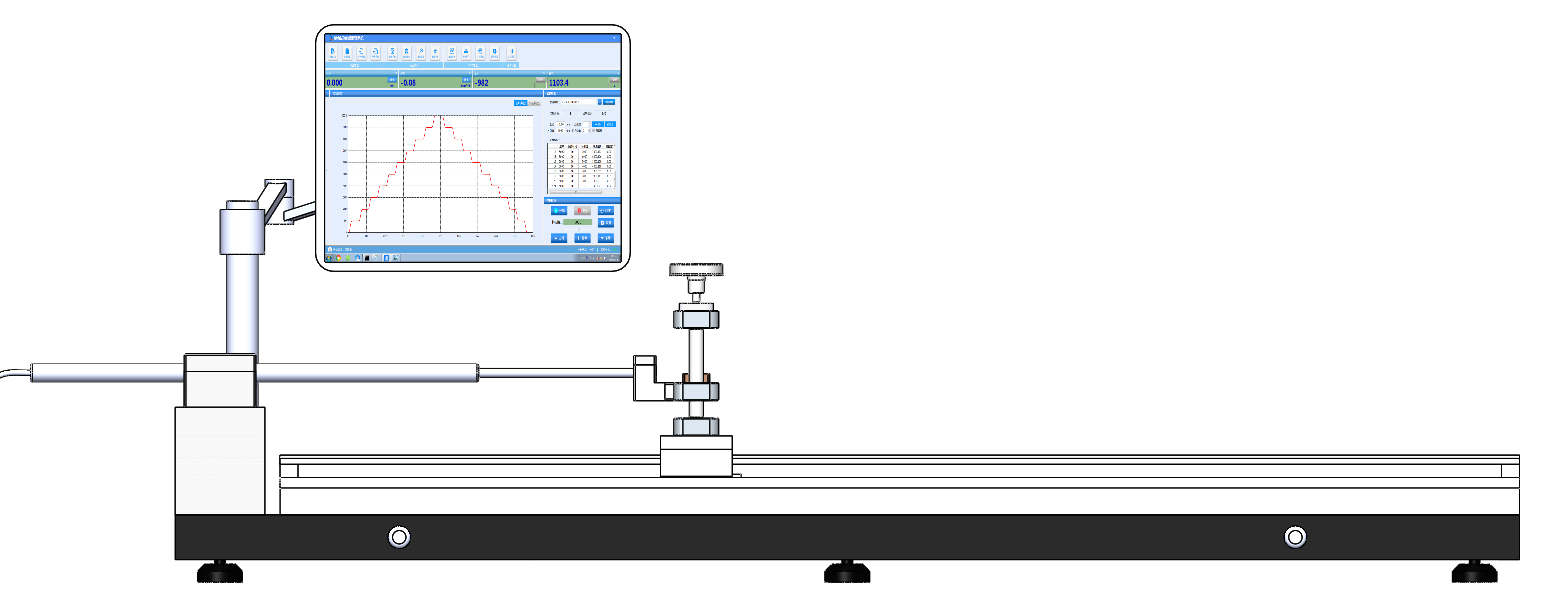
The ZCXWY-1000B automatic calibration device for linear displacement sensors is designed, developed, and produced by Wuxi Zice Tuoxin Measurement Technology Co., Ltd. in accordance with JJF 1305-2011 "Calibration Specification for Linear Displacement Sensors". Measurement is carried out using a measurement control system and high-precision grating displacement sensors for linear displacement sensing and vibrating wire sensors. Used for calibrating linear displacement sensors at various levels of metrology and testing institutes.

Technical parameter:
1. Measurement stroke: 1005mm.
2. Resolution: 0.1um;
3. Positioning accuracy: 1um;
4. Accuracy:
Indication error: ≤ 6 within 0-100mm μ m. 0-300mm ≤ 15 μ Within m
0-500mm ≤ 25 μ m. Whole process ≤ 40 μ M
Return error: ≤ 5 within 0-300mm μ m. 0-500mm ≤ 10 μ m. Full process ≤ 15 μ M
5. Environmental conditions: Indoor temperature: 20 ± 2 ℃; Room temperature change: 1 (℃/h); Relative humidity (%) ≤ 75.
6. Boundary dimensions: length 1600 x width 200 x height 500 (mm).
Performance characteristics:
1. The sensor electric detection platform is the length measurement standard and motion execution mechanism of the device. Mainly composed of benchmark linear guide rail, transmission mechanism, stepper motor, precision grating ruler, fixture and base. The grating ruler data output cable on the electric testing platform is connected to the servo motor drive cable and the electronic measurement and control box. The electronic measurement and control box is connected to the computer through Ethernet.
2. The reference linear guide rail adopts imported high-precision linear sliding guide rail as the linear guide rail. There are two sliders on top. On the slider on the right, install the sensor movable head fixing seat. On the left slider, install a sensor fixing fixture to clamp and fix the sensor.
3. Using imported precision grating rulers as displacement standards, the grating ruler reading head is installed on the side of the right slider, and the grating ruler is installed on the base. When the slider on the right moves, the reading head reads the distance of the sensor's moving head from the grating ruler.
4. The transmission mechanism consists of a precision ball screw and another linear guide rail, powered by a stepper motor. Form a complete and integrated transmission linear module. The linear module is installed parallel to the main guide rail, driving the movable slider on the benchmark linear guide rail to move.
5. The servo motor provides power, and the stepper motor is connected to the precision ball screw in the linear module through a coupling.
6. The fixture is used to fix various types of displacement sensors, and the center of the fixture is in a straight line with the center of the measuring head fixing seat.
7. It can automatically perform calibration work. After setting the calibration range, sensor model, number and other parameters, click the "Calibration" button to control the electric detection platform of the linear displacement sensor to automatically perform calibration work according to the specifications.
8. It can automatically detect the calibration points of the forward and reverse strokes for three cycles, automatically collect the displacement of the standard device of the electric detection platform, and collect the output data corresponding to the linear displacement sensor. Automatic forward and backward movement, smooth operation, and accurate positioning. Automatically read data and record detection data.
9. Automatically calculate and process detection data. Can calculate the reference line equation according to the calibration specifications. Obtain the sensitivity, basic error, linearity, return error, repeatability, and other results of the sensor
10. Automatically generate reports and output calibration results. Can automatically generate calibration original records. It can be saved to the database and queried by sensor model, number, detection date, and other conditions. Can be printed by a printer. It can be exported to Excel spreadsheets and PDF files. Can automatically generate calibration certificates.
11. The device standard can perform linear compensation and section compensation.


